Thursday, April 9, 2009

SharePoint (MOSS 2007) Analysis with Google Analytics

SharePoint (MOSS 2007) Analysis with Google Analytics

GA is a web analytics package provided free by Google.  I heard about this tool some time ago but never got any chance to use it. The very moment I heard of this tool, I got some illuminance as I can use it for SharePoint Site analysis.

We can apply GA to only one page OR whole site (master page). I'll explain both the ways one by one:

Applying GA to SharePoint Site Master Page:

Follow the Steps mentioned below:

  1. Obtain the Fully Qualified Domain Name (FQDN) for your MOSS site.

    For example, given a local hostname myhost and a parent domain name example.com, the fully qualified domain name is myhost.example.com.

  2. Create your Google Analytics account (see detail below). FYI, you don't need to pass any authentication in order to track hits to your site.

    When you set up your new account, you need to enter your FQDN in the URL field, and you need to enter it the way they specify:

  3. Add the GA tracking code to your site's master page within the HTML tags, which will allow you to analyze all the sub-pages, not just the home page. 

    Finding your personalized Google Analytics Tracking Code
    The tracking code is profile-specific, which is why you can only access it via the Profile Settings page for a specific profile. Below is an example of what the code snippet will look like. The symbols "xxxxxx-x" in the sample below is Google Analytics account number. You can find it in your personalized Google Analytics Tracking Code.


    Note: Google has created separate scripts for secure and non-secure URL. So while adding the Web Site URL in Step-2, you can select "http" OR "https". It will give you the appropriate script.

Point to be pondered:

I just want you to go back to Step-1, where I mentioned abut FQDN. But to work with MOSS what really needs to be entered for the Website URL is the full URL with the /pages/default.aspx ending. For example; if your domain is www.mydomain.com you would enter www.mydomain.com/pages/default.aspx.  This is because Google won't like the fact that it's getting redirected to /pages/default.aspx and will bail if you don't provide that part. For setting this full URL you have two options:

Option 1:

  1. From the home page of your Google Analytics account, click Edit:


  2. Click Edit at the upper right in the Profile Settings window:
  3. At this point you can change your website URL.  For the example I'm using, you would enter:

    <FQDN>/pages/default.aspx.

    For Example: http://mydomain.com/default.aspx


Option 2:

Option 2 is not much different from Option 1. Here in Option 2 you can keep your Website URL as FQDN and in addition you can specify the Default Page (i.e. default.aspx) also.


Note: After completing all the steps below, please be little patient as it will take 24 hours for Google to display your report.

Applying GA to SharePoint Page:

Applying Google Analytics to only one page includes all the steps for setup of Google analytics account. Other than that we need to perform some actions which I'm mentioning below:

  1. Add a Content editor Web Part to our SharePoint Site Page.
  2. Click on 'Modify Shared Web Part'.
  3. Click on the 'Source Editor'


Paste the Java Script provided by GA in this Source Editor. Click Save and then Click OK.

Thursday, April 2, 2009

Site Directory in SharePoint Site

Introduction:


When you create a site collection in SharePoint based on the OOTB starter template "Collaboration Portal Template" you get a series of sub sites such as "Document Center", "News", "Reports", "Search" and "Sites". The site called "Sites" is created by default and it comes wired with a site directory. Typically if your organization has just installed SharePoint or are evaluating SharePoint this "Collaboration Portal Template" is the first place an end user will start their interaction with SharePoint.

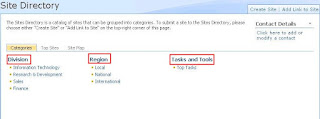
The out-of-box site directory includes three tabs: Categories, Top Sites,
and Site Map.

Categories and Top Sites rely upon information stored in the Sites list while the Site Map is automatically rendered.


The Categories Tab

The default categories that appear in the site directory are Division, Region,
and Tasks and Tools. These are column names in the Sites custom list (Sites > View All Site Content > Sites > Settings > List Settings). The sub-categories (e.g. beneath Region there is Local, National, and International) are column values for the column. In the case of Region, Region is a choice column in the Sites custom list and Local, National, and International are available values for that column.

The Sites custom list has several views.


  1. Categories:

This view defines what is shown on the Categories.aspx page. For example, if you open the Categories view (Sites > View All Site Content > Sites > Settings > List Settings > Views > Categories) you will see that the three columns that are checked are Division, Region, and Tasks and Tools. These represent the categories that are visible on the Categories.aspx page.


  1. Site Creation Categories:

This view defines what categories appear when a new site is created.


Listing Sites in Site Directory

When you create a new site and indicate that you want it to be listed in the site directory, and you specify which categories you want it listed under, a new list item is created in the Sites custom list. For example, if you click Site Actions > Create Site and you create a site called Test Site 1, listing it under all possible site categories, then a new list item is created in the Sites custom list.

The Division and Region values you specified when you created the site appear as properties data for that list item. Since you selected all of the possible Division and Region values when you created Test Site 1, you can test the way the site directory works by clicking on one of these categories in the site directory.

You can add previously created sites to the site directory by creating new list items in the Sites custom list.


Specifying a Different Site Directory

If you delete the default Site Directory site and create a new one you will notice that the site creation options for listing new sites in a site directory are no longer available. In order to associate site creation to a Site Directory other than the default one, you need to specify this new Site Directory.

Navigate to Home > Site Actions > Site Settings > Modify All Site Settings > Site Collection Administration > Site Directory Settings. Here you can define the location of the Site Directory. You can also enforce site creation options from this screen.


Master Site Directory

To ensure that any site and site collection being created within your SharePoint farm is listed in your "Site Directory" you need to add/configure the URL of your "Site Directory" in Central Administration. Go to Central Administration and to the Operations Tab. Under "Global Configuration" click on "Master site directory settings".


Once the URL of your master site directory has been set you can enforce the listing of new site collections in the Site Directory and ensure that you capture the correct Categorization meta data for your sites. This setting effectively provides the Global location for your Master Site Directory. You may think that this is all it's required to list all the sites in the Site Directory but you also need to configure this at your site collection level in your deployment.

Site Directory Links Scan

Another most often overlooked functional part of maintaining the Site Directory is hidden away in Central Administration. This is called "Site Directory Links Scan"

Effectively you can check for broken site links and get a report as well as update your site description listings in the Site Directory using Site Directory Links Scan. Site Directory Links Scan is available via the Operations tab in Central Administration.


The site property update is automated to reflect any changes you may apply to how the sites are categorized and listed in the Sites list in your Site Directory.

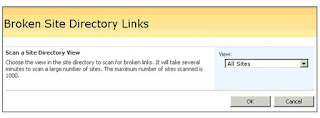
Once you have enabled Site Directory Links Scan you can also go to your SharePoint Site and from your Site Directory site select Site Settings and "Scan for Broken Links" which will initiate a manual scan. This will search the "Sites" list located in the Site Directory site for any changed or broken links.


The scanner will provide you with options of what View you would like to scan and update you of the Scan progress.


MOSS with ATLAS (ASP.Net AJAX)


Introduction - MOSS with ASP.Net AJAX:

ASP.NET AJAX is the newest addition to ASP.NET 2.0 and is a supported Microsoft framework for next-generation Web development using AJAX technologies. AJAX is shorthand for "Asynchronous JavaScript + XML," an approach to Web applications that utilizes asynchronous data requests from the page with a client-side JavaScript engine. It is not one technology, but rather a combination of technologies that enables rich-client responsiveness in the browser when used together. It's also not a new technology, but rather a new trend that combines old technologies in a new way. The technologies include object-oriented JavaScript, asynchronous data requests utilizing the XMLHttpRequest object, XML data streams, Extensible Style sheet Language transformation (XSLT) transforms, and dynamic manipulation of the HTML Document Object Model (DOM). It more closely resembles a recipe for Web applications than a single architecture-it is an approach to Web applications based on rendering and manipulating data in smaller components during the page's life cycle in response to user actions on the client rather than the processing of the entire page as a whole. Because of this design pattern, Web Parts make an excellent deployment mechanism for AJAX components in Microsoft Windows SharePoint Services (WSS), and many of the built-in WSS APIs can be leveraged in JavaScript code from the browser.

The main benefit of using AJAX techniques in Web applications is an increased level of responsiveness once possible only in rich-client applications. Instead of waiting for a page reload or form post to update the user interface, the browser can send a discrete call to the server by using the XmlHttpRequest object while enabling the user to continue working.

Windows SharePoint Services version 3 builds much more directly on top of ASP.NET 2.0; therefore, many of the capabilities of ASP.NET AJAX work directly with SharePoint.
In a few cases there are some compatibility issues between ASP.NET AJAX and SharePoint (anticipated to be addressed in the first service pack of Windows SharePoint Services). Specifically, there are some limitations on usages of the UpdatePanel in web parts and controls. I personally experienced this issue in TreeView control inside the Update Panel.


Adding ASP.NET AJAX to SharePoint Pages :

  1. Download and install ASP.NET AJAX on servers in your farm.
  2. Extend web.config with some settings to enable ASP.NET AJAX technology.
  3. Add the ASP.NET AJAX Script Manager into your master page to enable scenarios such as Extenders or UpdatePanels. (Install the full "ASP.NET 2.0 AJAX Extensions 1.0" from ajax.asp.net. )

The AJAX WSS Web page life cycle:

The figure below (Figure – 1.0) illustrates the dynamic nature of the AJAX approach. Instead of one fat data stream being processed in the main request/response, individual components are responsible for their processing and can be individually refreshed and updated in response to user actions, events, or timer components.


(Figure – 1.0)

The user interface and data streams could also evolve over the client life cycle of the page-new components can be spawned from additional data sources and loaded into new components, all without reloading or posting the Web page. The Web page life cycle is much longer in an AJAX application because the page is not refreshed after the initial page load.

AJAX Web Parts:

AJAX components within Web Parts require the Web Part Client Control Registration Pattern. With this design pattern, a placeholder is registered with the page and processed through a convention in the JavaScript application load event.

The other most important thing is Extending SharePoint web.config files with ASP.NET AJAX. It requires some Ajax registration entries in-line with WSS registration entries.

Sample Code:

using System;
using System.Text;
using System.Web.UI;
using System.Web.UI.WebControls;
using System.Web.UI.WebControls.WebParts;
using Microsoft.SharePoint;
using Microsoft.SharePoint.Utilities;
using Microsoft.SharePoint.WebControls;
using Microsoft.SharePoint.Administration;
using System.Reflection;
using System.Data;
namespace AJAXWebPart
{
public class AJAXWebPart:WebPart
{
System.Text.StringBuilder html = new System.Text.StringBuilder();
SPTreeView sptv; // SharePoint display TreeView
TreeView tv; // Dummy Tree view asp.net control
string strSPWebApplication = "";
private DataTable _table;

protected override void CreateChildControls()
{
base.CreateChildControls();
this.EnsureUpdatePanelFixups();
UpdatePanel up = new UpdatePanel();
up.ID = "UpdatePanel1";
up.ChildrenAsTriggers = true;
up.UpdateMode = UpdatePanelUpdateMode.Conditional;
this.Controls.Add(up);
tv = new TreeView();
sptv = new SPTreeView();
GetSiteCollection(); //Function to Fill all Site Collection Only..
sptv.CollapseAll();
sptv.TreeNodeExpanded += new TreeNodeEventHandler(sptv_TreeNodeExpanded);
sptv.TreeNodeCollapsed += new TreeNodeEventHandler(sptv_TreeNodeCollapsed);
up.ContentTemplateContainer.Controls.Add(tv);
up.ContentTemplateContainer.Controls.Add(sptv);
}
void sptv_TreeNodeCollapsed(object sender, TreeNodeEventArgs e)
{
TreeNode CurNode = new TreeNode();
CurNode = e.Node;
CurNode.CollapseAll();
}

void sptv_TreeNodeExpanded(object sender, TreeNodeEventArgs e)
{
TreeNode CurNode = new TreeNode();
string strWebNode = e.Node.Text;
CurNode = e.Node;
CurNode.ChildNodes.Clear();
CreateTreeOnExpandNode(strWebNode, CurNode);
}
public void CreateTreeOnExpandNode(string URL,TreeNode nodeExpanded)
{
SPSite site = new SPSite(URL);
SPWeb web = site.RootWeb;
//rootnode = new TreeNode(web.Url);
foreach (SPWeb web1 in web.Webs)
{
TreeNode childnode = new TreeNode(web1.Url);
GetChild(web1, childnode);
nodeExpanded.ChildNodes.Add(childnode);
}
}
private void GetChild(SPWeb web1, TreeNode refnode)
{
foreach (SPWeb web2 in web1.Webs)
{
TreeNode subsitenode = new TreeNode(web2.Url);
refnode.ChildNodes.Add(subsitenode);
GetChild(web2, subsitenode);
}
}
public void GetSiteCollection()
{
SPWebApplication wa;
wa = SPControl.GetContextWebApplication(Context);//Get Url from HTTP context
SPSiteCollection wasites = wa.Sites;
TreeNode rootnode;
sptv.RootNodeStyle.ImageUrl = "/_layouts/1033/IMAGES/USM.gif";
foreach (SPSite site in wasites)
{
SPWeb web = site.RootWeb;
rootnode = new TreeNode(web.Url);
if (web.Webs.Count > 0)
{
TreeNode emptyNode = new TreeNode();
rootnode.Collapse();
rootnode.ChildNodes.Add(emptyNode);
}
sptv.Nodes.Add(rootnode);
}
}

private void EnsureUpdatePanelFixups()
{
if (this.Page.Form != null)
{
string formOnSubmitAtt = this.Page.Form.Attributes["onsubmit"];
if (formOnSubmitAtt == "return _spFormOnSubmitWrapper();")
{
this.Page.Form.Attributes["onsubmit"] = "_spFormOnSubmitWrapper();";
}
}
ScriptManager.RegisterStartupScript(this, typeof(AJAXWebPart), "UpdatePanelFixup", "_spOriginalFormAction = document.forms[0].action; _spSuppressFormOnSubmitWrapper=true;", true);
}


}
}